Blog
Our Top Blog Posts
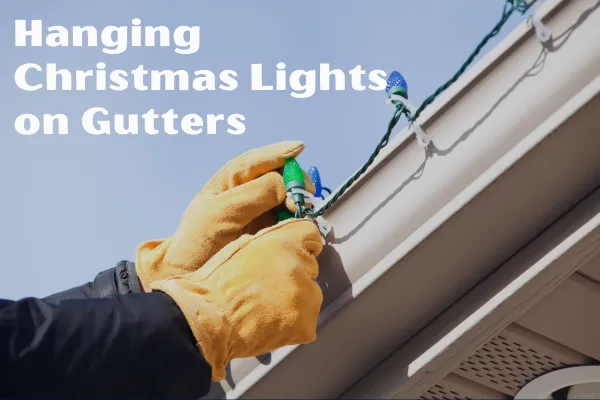
How To Hang Christmas Lights on Gutters
Did you know that over 85% of Americans decorate their homes with Christmas lights during the holiday season? If you're planning to join this festive majority by adorning your gutters with twinkling lights, you're in for a bit of a challenge—but don't worry, it's nothing you can't handle. The key lies in selecting the right clips that securely attach to your type of gutter, ensuring your lights stay put through wind and weather. However, before you climb that ladder, there's one crucial consideration you might not have thought about yet. Stick around to find out what could make or break your holiday display before you even begin.
Planning and Preparation
Before diving into the festive task of hanging Christmas lights, it's crucial to map out your plan, focusing on the layout of your home's exterior and the placement of available power sources. You'll want to start by assessing outlet placement relative to where you're planning to hang your lights. If outlets aren't conveniently located, you might need an extension cord or plan a layout that circles back to your power source.
Next, consider the surfaces you're hanging the lights on. Are you focusing solely on gutters, or are you incorporating windows, doors, and eaves? This will influence whether you'll need gutter clips designed for vertical or horizontal hanging. Remember, the type of surface dictates the type of clip you'll need to secure your lights effectively.
You'll also need to calculate the total distance you want to cover with lights. This involves measuring the length of your gutters and any additional areas you plan to decorate. Then, based on this distance, determine the quantity of lights and bulb sets you'll need. Always buy extra supplies to account for any unexpected issues or expansions of your design.
LED lights are your best bet for efficiency, especially if you're covering a long distance with limited outlet access. These bulbs come in various types, so choose based on your desired aesthetic and the amount of light they emit. Remember, LED lights can save you on power consumption, allowing you to add more lights without overloading your circuits. See our blog post Choosing the Right Tools and Equipment for a Professional Christmas Lights Installation Business for useful information on picking out the right supplies and tools you need.
Selecting Lights and Clips
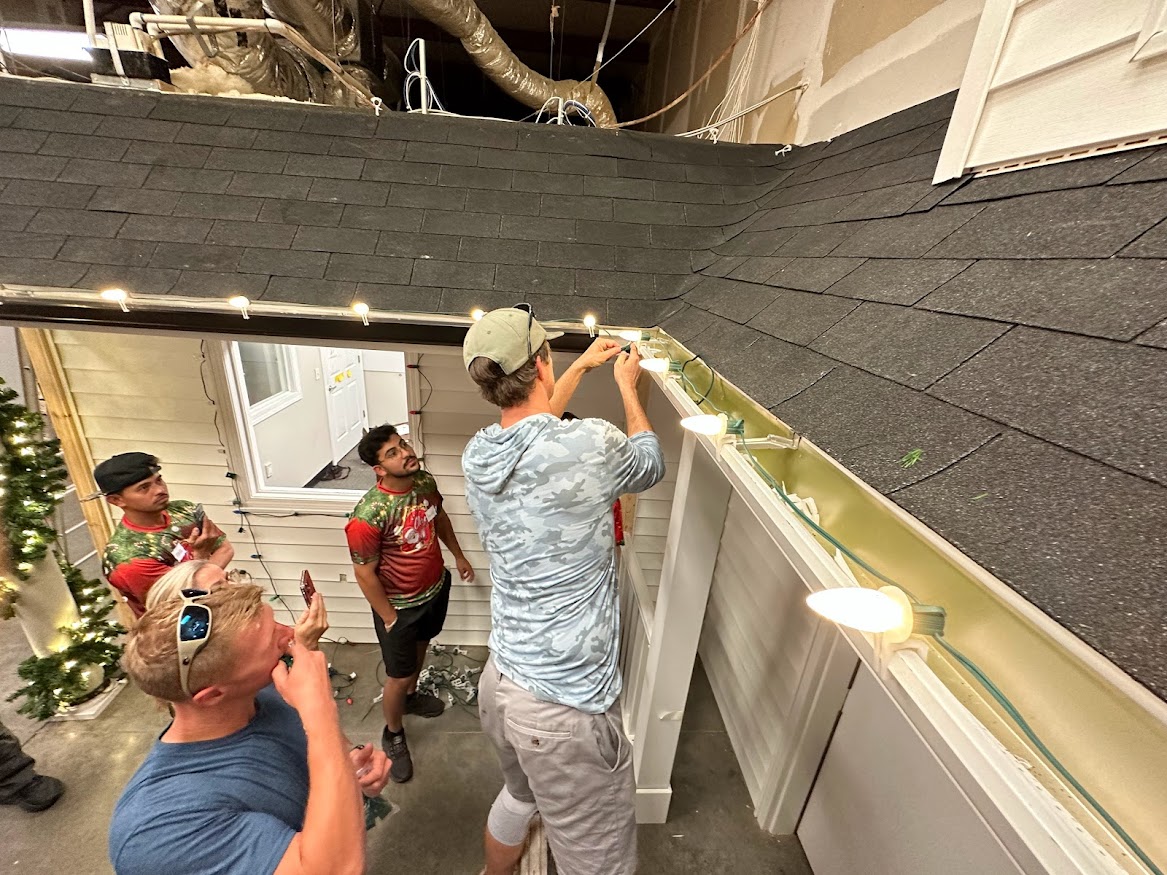
Choosing the right lights and clips is crucial to ensure your Christmas decorations hang beautifully and securely on your gutters. When selecting lights, consider the variety of light colors available. You'll want to pick colors that complement your home's exterior and the holiday theme you're aiming for. Also, think about the type of lights—whether you're going for the classic look of C7 or C9 bulbs, or perhaps the whimsical effect of icicle lights.
As for clips, their placement on your gutters plays a significant role in achieving an even and attractive display. Ensure you choose clips that are compatible with your gutter type and the lights you've selected. It's also wise to have a few extra clips on hand, just in case you need more than you initially thought.
Don't forget to consider the logistics of powering your lights. You'll likely need extension cords to bridge the gap between your power source and the starting point of your light display. Opt for weather-resistant extension cords to ensure safety and durability throughout the holiday season. Speaking of weather resistance, it's not just about the extension cords. Your lights and clips should also be able to withstand the elements, ensuring your display remains bright and intact no matter the weather.

Hanging Christmas Lights
To hang Christmas lights on your gutters effectively, start by attaching a gutter clip for each light at your chosen direction. This simple step is the cornerstone of transforming your home into a beacon of holiday cheer. Remember, the goal isn't just to illuminate; it's to enchant. As you embark on this DIY project, consider it an opportunity to add a personal touch to your outdoor decorations. The festive lighting you're installing is more than mere bulbs—it's a manifestation of the joy and warmth the season brings.
Before climbing the ladder, plan your route. Starting from the side closest to your power outlet minimizes the need for extensive wiring and ensures a clean, organized look. As you progress, ensure each light is securely fastened to avoid any mid-season maintenance. The beauty of exterior illumination lies not just in the visual delight it offers but also in the precision of its installation.
Remember, you're not just setting up lights; you're crafting an experience for everyone who lays eyes on your home. Every bulb you clip on, every string you stretch across the gutters, adds to the collective pool of festive lighting that adorns neighborhoods around the world during this special time.
In this endeavor, safety is paramount. Ensure your ladder is stable and you're equipped with all necessary tools before beginning. This process of adding lights to your gutters is a tangible expression of the holiday spirit—a way to share a bit of yourself with the world through splendid outdoor decorations.
Calculating Wattage and Supplies
Calculating the wattage and supplies required is your next step in ensuring a bright and safe holiday display. You'll need to start with a wattage estimation to avoid overloading your circuits. Look at the packaging of your chosen lights to find their wattage, then multiply by the number of strands you plan to use. This total shouldn't exceed the wattage capacity of your outlet to keep things safe.
Now, let's compile your supply checklist. Besides the lights themselves, ensure you've got enough light clips designed for gutter attachment. You don't want to find yourself halfway done and out of clips. Also, keep extra bulbs on hand for quick replacements.
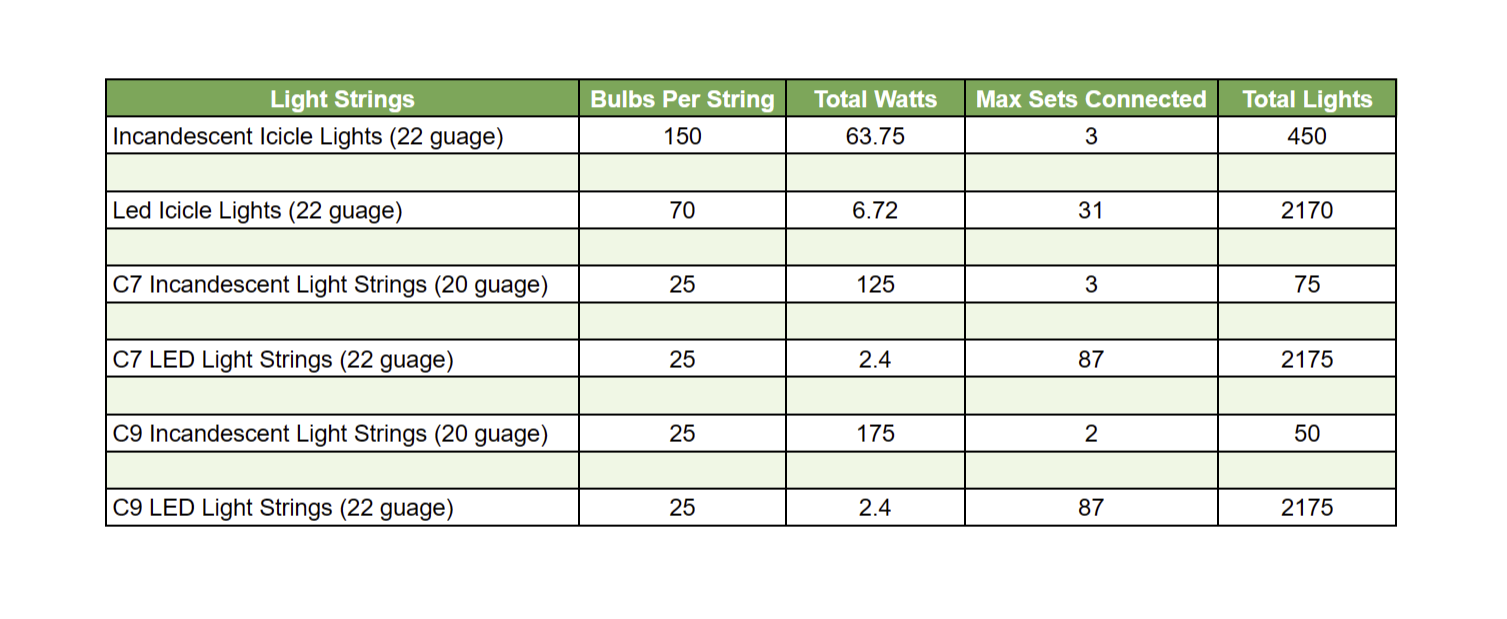
When it comes to bulb selection tips, consider LED lights for their lower wattage and longer life span. They'll let you connect more strands together compared to traditional bulbs without exceeding your wattage limit.
Extension cord usage is next. You'll likely need at least one to bridge the gap between your outlet and the start of your lights. Opt for an outdoor-rated extension to withstand the elements and avoid potential hazards.
Lastly, don't overlook safety precautions. Ensure all electrical connections are away from water sources and secure lights and cords to prevent tripping hazards. Using a durable, stable ladder while hanging lights will also keep you safe.

Hanging Lights Across Peaks
How do you tackle the challenge of hanging Christmas lights across the peaks of your house for a festive display? It may seem daunting, but with the right tools and techniques, you'll have your home shining brightly in no time. First off, you'll need to get your hands on some shingle tabs and screw bulbs. These are essential for securing your lights to the roof without causing damage.
As you approach the peaks, transition techniques become crucial. If you're moving from gutters to the roofline, you might need to start with new light strings to ensure a seamless look. This is where socket caps come into play. They're perfect for covering unused sockets, ensuring that every light shines exactly where you want it to. Don't forget to wrap the connections with electrical tape for an extra layer of protection against the elements.
Ensuring a secure fit for your lights is paramount, especially at the highest points of your home. Shingle tabs should slide between the house and the shingle, providing a sturdy base for each bulb. This method not only keeps your lights in place but also prevents any potential damage to your roof. If you're interested in learning more techniques like this plus more, check out our Christmas Lights In-Person Training.
How Do I Safely Hang Christmas Lights on Gutters With a Guard or Leaf Protection System?
Ironically, you're gearing up to brave the heights, not to clean those gutters, but to turn your home into a festive beacon. First, grab a light clips guide; it's your roadmap in a world of gutters shielded like fortresses. Don't skimp on safety equipment—think helmet, gloves, and sturdy ladder placement. Before the grand lighting ceremony, ensure your lights are weatherproofed. Remember, gutter cleaning tips are handy, but today, they're just the opening act.
Many Homeowners Have Gutter Guards to Prevent Debris From Clogging Their Gutters. Hanging Christmas Lights on These Can Be Challenging Without Causing Damage or Affecting the Gutter Guard's Functionality. This Question Addresses the Specifics of Navigating This Common Issue.
You're facing a common challenge: hanging Christmas lights without harming your gutter guards. Use gutter clips to securely attach lights without damage. Opt for a variety of lights to best fit your gutter's shape and size. Practice safety by installing during daylight and removing lights carefully to avoid guard damage. Remember, timing is key; don't rush installation or removal. This approach ensures your festive display is both stunning and safe.
For further information and tips & tricks see our blog post How To Install Christmas Lights On Gutters With Gutter Guards.
What Are the Best Practices for Hanging Christmas Lights on Gutters in Harsh Weather Areas?
To hang Christmas lights in harsh weather areas, you'll need weatherproof clips for secure attachment. Position lights where they'll have minimal exposure to elements. Test for durability before the season hits. Always prioritize ladder safety, ensuring it's stable before climbing. Optimal installation timing is crucial; set up lights before weather worsens. These steps help prevent damage and ensure your lights stay bright and cheerful throughout the season, despite the weather challenges.
In Regions Where Winter Brings Heavy Snow, Ice, or Strong Winds, Hanging Lights Securely and Safely Requires Additional Considerations. This Question Would Delve Into Materials and Methods That Withstand Harsh Weather Conditions.
Braving the winter elements feels like an epic quest when hanging Christmas lights. You'll need weatherproof clips that laugh in the face of fierce winds. Opt for installation techniques that prioritize material durability and your safety. Don't skimp on protective equipment; it's your armor against the unpredictable. Following these safety measures ensures your light display stands strong, turning your home into a beacon of holiday spirit amidst the harshest winter weather.
How Can I Integrate Smart Technology With My Outdoor Christmas Lights for Ease of Control and Scheduling?
To integrate smart technology with your outdoor Christmas lights, start by choosing smart bulbs that offer app compatibility. This lets you control lights and schedule them easily from your phone. You can also use voice commands for hands-free operation. Look for options that support light synchronization for an impressive display and consider energy monitoring features to keep your holiday cheer efficient. With these smart solutions, you'll elevate your festive setup to the next level.

As you step back to admire your handiwork, your home now twinkles like a star in the vast winter sky, a beacon of joy and warmth in the chilly night. You've not just hung lights; you've woven a tapestry of holiday magic around your home. Each glowing bulb is a testament to your care and dedication, lighting the way for festive cheer. Remember, these lights are more than decoration—they're a symbol of the light you bring to your world.

How To Hang Christmas Lights on Gutters
Did you know that over 85% of Americans decorate their homes with Christmas lights during the holiday season? If you're planning to join this festive majority by adorning your gutters with twinkling lights, you're in for a bit of a challenge—but don't worry, it's nothing you can't handle. The key lies in selecting the right clips that securely attach to your type of gutter, ensuring your lights stay put through wind and weather. However, before you climb that ladder, there's one crucial consideration you might not have thought about yet. Stick around to find out what could make or break your holiday display before you even begin.
Planning and Preparation
Before diving into the festive task of hanging Christmas lights, it's crucial to map out your plan, focusing on the layout of your home's exterior and the placement of available power sources. You'll want to start by assessing outlet placement relative to where you're planning to hang your lights. If outlets aren't conveniently located, you might need an extension cord or plan a layout that circles back to your power source.
Next, consider the surfaces you're hanging the lights on. Are you focusing solely on gutters, or are you incorporating windows, doors, and eaves? This will influence whether you'll need gutter clips designed for vertical or horizontal hanging. Remember, the type of surface dictates the type of clip you'll need to secure your lights effectively.
You'll also need to calculate the total distance you want to cover with lights. This involves measuring the length of your gutters and any additional areas you plan to decorate. Then, based on this distance, determine the quantity of lights and bulb sets you'll need. Always buy extra supplies to account for any unexpected issues or expansions of your design.
LED lights are your best bet for efficiency, especially if you're covering a long distance with limited outlet access. These bulbs come in various types, so choose based on your desired aesthetic and the amount of light they emit. Remember, LED lights can save you on power consumption, allowing you to add more lights without overloading your circuits. See our blog post Choosing the Right Tools and Equipment for a Professional Christmas Lights Installation Business for useful information on picking out the right supplies and tools you need.

Selecting Lights and Clips
Choosing the right lights and clips is crucial to ensure your Christmas decorations hang beautifully and securely on your gutters. When selecting lights, consider the variety of light colors available. You'll want to pick colors that complement your home's exterior and the holiday theme you're aiming for. Also, think about the type of lights—whether you're going for the classic look of C7 or C9 bulbs, or perhaps the whimsical effect of icicle lights.
As for clips, their placement on your gutters plays a significant role in achieving an even and attractive display. Ensure you choose clips that are compatible with your gutter type and the lights you've selected. It's also wise to have a few extra clips on hand, just in case you need more than you initially thought.
Don't forget to consider the logistics of powering your lights. You'll likely need extension cords to bridge the gap between your power source and the starting point of your light display. Opt for weather-resistant extension cords to ensure safety and durability throughout the holiday season. Speaking of weather resistance, it's not just about the extension cords. Your lights and clips should also be able to withstand the elements, ensuring your display remains bright and intact no matter the weather.

Hanging Christmas Lights
To hang Christmas lights on your gutters effectively, start by attaching a gutter clip for each light at your chosen direction. This simple step is the cornerstone of transforming your home into a beacon of holiday cheer. Remember, the goal isn't just to illuminate; it's to enchant. As you embark on this DIY project, consider it an opportunity to add a personal touch to your outdoor decorations. The festive lighting you're installing is more than mere bulbs—it's a manifestation of the joy and warmth the season brings.
Before climbing the ladder, plan your route. Starting from the side closest to your power outlet minimizes the need for extensive wiring and ensures a clean, organized look. As you progress, ensure each light is securely fastened to avoid any mid-season maintenance. The beauty of exterior illumination lies not just in the visual delight it offers but also in the precision of its installation.
Remember, you're not just setting up lights; you're crafting an experience for everyone who lays eyes on your home. Every bulb you clip on, every string you stretch across the gutters, adds to the collective pool of festive lighting that adorns neighborhoods around the world during this special time.
In this endeavor, safety is paramount. Ensure your ladder is stable and you're equipped with all necessary tools before beginning. This process of adding lights to your gutters is a tangible expression of the holiday spirit—a way to share a bit of yourself with the world through splendid outdoor decorations.

Calculating Wattage and Supplies
Calculating the wattage and supplies required is your next step in ensuring a bright and safe holiday display. You'll need to start with a wattage estimation to avoid overloading your circuits. Look at the packaging of your chosen lights to find their wattage, then multiply by the number of strands you plan to use. This total shouldn't exceed the wattage capacity of your outlet to keep things safe.
Now, let's compile your supply checklist. Besides the lights themselves, ensure you've got enough light clips designed for gutter attachment. You don't want to find yourself halfway done and out of clips. Also, keep extra bulbs on hand for quick replacements.

When it comes to bulb selection tips, consider LED lights for their lower wattage and longer life span. They'll let you connect more strands together compared to traditional bulbs without exceeding your wattage limit.
Extension cord usage is next. You'll likely need at least one to bridge the gap between your outlet and the start of your lights. Opt for an outdoor-rated extension to withstand the elements and avoid potential hazards.
Lastly, don't overlook safety precautions. Ensure all electrical connections are away from water sources and secure lights and cords to prevent tripping hazards. Using a durable, stable ladder while hanging lights will also keep you safe.

Hanging Lights Across Peaks
How do you tackle the challenge of hanging Christmas lights across the peaks of your house for a festive display? It may seem daunting, but with the right tools and techniques, you'll have your home shining brightly in no time. First off, you'll need to get your hands on some shingle tabs and screw bulbs. These are essential for securing your lights to the roof without causing damage.
As you approach the peaks, transition techniques become crucial. If you're moving from gutters to the roofline, you might need to start with new light strings to ensure a seamless look. This is where socket caps come into play. They're perfect for covering unused sockets, ensuring that every light shines exactly where you want it to. Don't forget to wrap the connections with electrical tape for an extra layer of protection against the elements.
Ensuring a secure fit for your lights is paramount, especially at the highest points of your home. Shingle tabs should slide between the house and the shingle, providing a sturdy base for each bulb. This method not only keeps your lights in place but also prevents any potential damage to your roof. If you're interested in learning more techniques like this plus more, check out our Christmas Lights In-Person Training.

How Do I Safely Hang Christmas Lights on Gutters With a Guard or Leaf Protection System?
Ironically, you're gearing up to brave the heights, not to clean those gutters, but to turn your home into a festive beacon. First, grab a light clips guide; it's your roadmap in a world of gutters shielded like fortresses. Don't skimp on safety equipment—think helmet, gloves, and sturdy ladder placement. Before the grand lighting ceremony, ensure your lights are weatherproofed. Remember, gutter cleaning tips are handy, but today, they're just the opening act.
Many Homeowners Have Gutter Guards to Prevent Debris From Clogging Their Gutters. Hanging Christmas Lights on These Can Be Challenging Without Causing Damage or Affecting the Gutter Guard's Functionality. This Question Addresses the Specifics of Navigating This Common Issue.
You're facing a common challenge: hanging Christmas lights without harming your gutter guards. Use gutter clips to securely attach lights without damage. Opt for a variety of lights to best fit your gutter's shape and size. Practice safety by installing during daylight and removing lights carefully to avoid guard damage. Remember, timing is key; don't rush installation or removal. This approach ensures your festive display is both stunning and safe.
For further information and tips & tricks see our blog post How To Install Christmas Lights On Gutters With Gutter Guards.
What Are the Best Practices for Hanging Christmas Lights on Gutters in Harsh Weather Areas?
To hang Christmas lights in harsh weather areas, you'll need weatherproof clips for secure attachment. Position lights where they'll have minimal exposure to elements. Test for durability before the season hits. Always prioritize ladder safety, ensuring it's stable before climbing. Optimal installation timing is crucial; set up lights before weather worsens. These steps help prevent damage and ensure your lights stay bright and cheerful throughout the season, despite the weather challenges.
In Regions Where Winter Brings Heavy Snow, Ice, or Strong Winds, Hanging Lights Securely and Safely Requires Additional Considerations. This Question Would Delve Into Materials and Methods That Withstand Harsh Weather Conditions.
Braving the winter elements feels like an epic quest when hanging Christmas lights. You'll need weatherproof clips that laugh in the face of fierce winds. Opt for installation techniques that prioritize material durability and your safety. Don't skimp on protective equipment; it's your armor against the unpredictable. Following these safety measures ensures your light display stands strong, turning your home into a beacon of holiday spirit amidst the harshest winter weather.
How Can I Integrate Smart Technology With My Outdoor Christmas Lights for Ease of Control and Scheduling?
To integrate smart technology with your outdoor Christmas lights, start by choosing smart bulbs that offer app compatibility. This lets you control lights and schedule them easily from your phone. You can also use voice commands for hands-free operation. Look for options that support light synchronization for an impressive display and consider energy monitoring features to keep your holiday cheer efficient. With these smart solutions, you'll elevate your festive setup to the next level.

As you step back to admire your handiwork, your home now twinkles like a star in the vast winter sky, a beacon of joy and warmth in the chilly night. You've not just hung lights; you've woven a tapestry of holiday magic around your home. Each glowing bulb is a testament to your care and dedication, lighting the way for festive cheer. Remember, these lights are more than decoration—they're a symbol of the light you bring to your world.
Copyright ©2026 All Right Reserved website designed by christmaslights.io
Terms of Service / Privacy Policy
Have questions or need assistance?
Contact us at (855)619-LITE

