

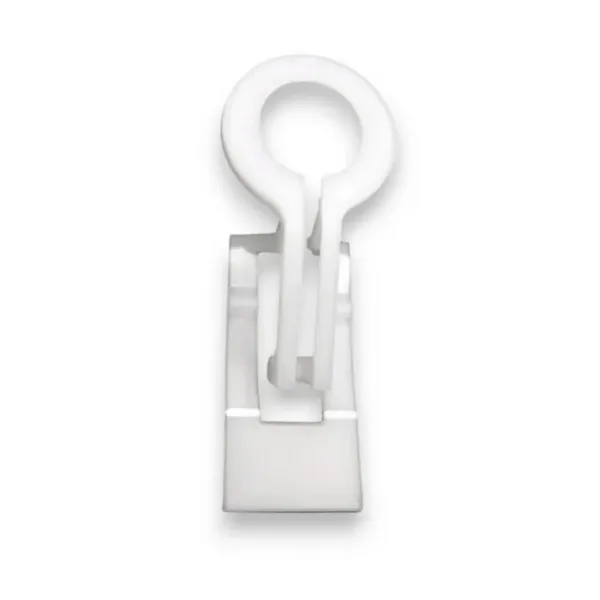
Wholesale Pricing Presale Christmas Lights Clips
Pre-Season Wholesale C9 Best Clips
As Low As $0.14 per Clip
Elevate your Christmas light installations with the C9 Best Clip, the industry’s top choice for professional holiday decorators. Designed by a professional installer specifically for other installers, this nearly unbreakable clip is crafted to withstand the rigors of outdoor use season after season. Whether you're working on gutters, drip edges, or even shingles, the C9 Best Clip is the versatile, durable solution that makes your job easier and keeps costs down over the years.
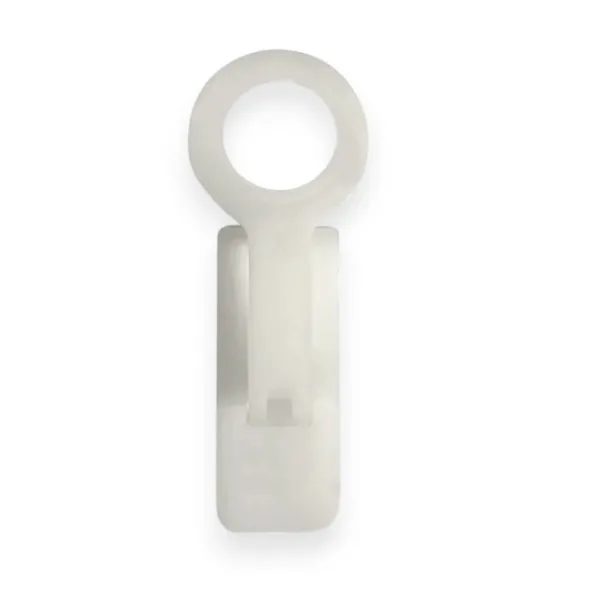
Colors Available:
White
Brown
Quantities Available:
1000/case
2000/case
Key Features:
Heavy-Duty Construction: Built from nearly unbreakable materials, the C9 Best Clip is designed to endure harsh weather conditions, ensuring reliable performance year after year.
Installer-Approved Design: Created by a professional Christmas light installer, this clip is engineered to meet the demands of the job, making installations faster and more efficient.
Versatile Use: The C9 Best Clip is perfect for securing lights along gutters, drip edges, and, in some cases, shingles, providing flexibility for a wide range of installation scenarios.
Cost-Effective: Reusable and durable, the C9 Best Clip is a cost-effective choice for professional installers, reducing the need for frequent replacements and lowering overall installation costs.
Recommended by Professionals: Trusted and recommended by expert Christmas light installers, the C9 Best Clip is the go-to solution for securing C9 bulbs and other holiday lighting elements.
Pre-Season Wholesale Best Shingle Tab Clips
As Low As $0.12 per Clip
Upgrade your Christmas light installations with the Durable Shingle Tab, designed to outlast and outperform standard shingle tabs. Made from highly durable plastic, this shingle tab provides a longer-lasting, more secure hold for both C7 and C9 sockets, ensuring your holiday lights stay perfectly in place. Whether you're installing lights on shingles, gutters, or decks, this versatile tab is the perfect Christmas light accessory.
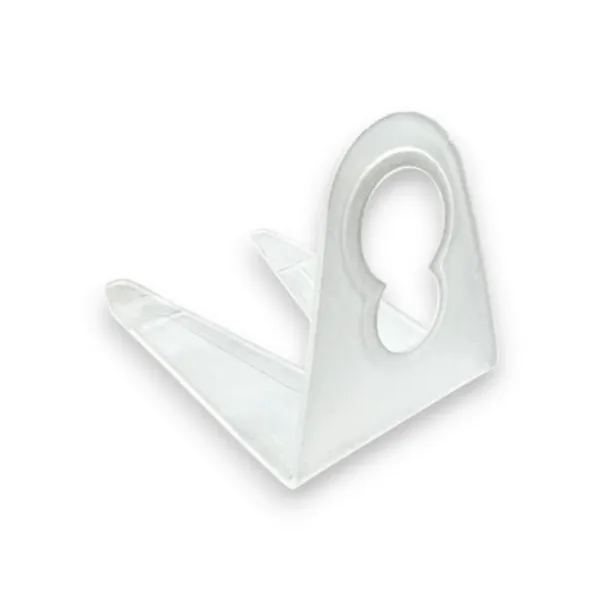
Colors Available:
White
Quantities Available:
1000/case
Key Features:
Very Durable Plastic: Constructed from premium, long-lasting plastic, this shingle tab is built to endure harsh weather conditions, providing years of reliable use—far exceeding the lifespan of standard shingle tabs.
Superior Socket Hold: Specifically designed to hold C7 and C9 sockets more securely than regular shingle tabs, ensuring your lights remain in place throughout the holiday season.
Easy Installation: The tab's design allows it to slide easily under shingles, making installation quicker and less frustrating than with other shingle tabs.
Versatile Use: Perfect for use on shingles, gutters, and decks. Simply wedge the legs within available spaces to secure the tab, or use it in conjunction with a parapet clip on flat surfaces for added stability.
Compatible with Parapet Clip: For flat surfaces, pair this shingle tab with a parapet clip to achieve a secure, professional-grade installation. It’s the perfect accessory for any Christmas light display.
Pre-Season Wholesale C9/C7 Best Enclosed Ridge Clips 500/Case
As Low As $0.40 per Clip
The Best Enclosed Ridge Clip is designed for professional holiday lighting installations, offering unbeatable security, durability, and versatility. Made from high-quality, durable plastic, this clip features an enclosed design that ensures it will never detach from the light strand, providing confidence that your lights will stay firmly in place. Its extended length accommodates any ridge shingle without causing damage, making it perfect for worry-free installations. Plus, it’s compatible with both C9 and C7 bulbs, adding even more flexibility to your setup.
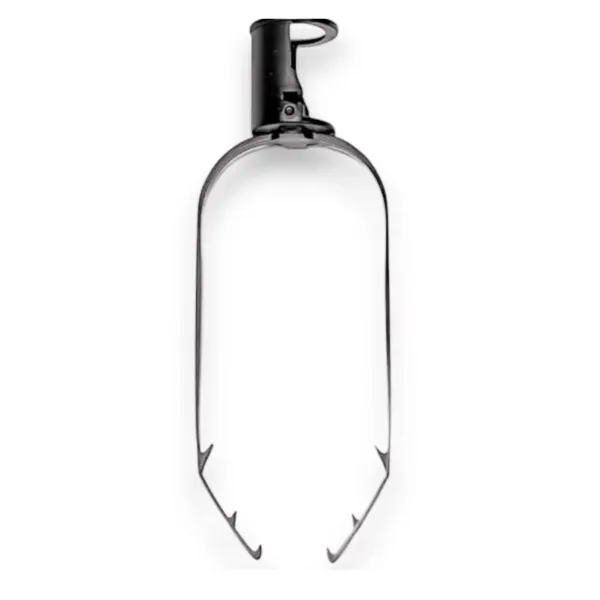
Colors Available:
Black
Quantities Available:
500/case
Key Features:
Durable Plastic Construction: Crafted from robust, high-grade plastic, these clips are built to endure tough weather conditions, ensuring long-lasting use season after season.
Enclosed Design: The unique enclosed structure securely locks onto the light strand, preventing the clip from slipping or detaching, even in windy or adverse weather.
Extended Length for Versatility: The longer design ensures a secure fit on any ridge shingle without causing damage, offering compatibility with various roof types.
Works with C9 and C7 Bulbs: Specifically designed to hold both C9 and C7 light strands, providing versatility and ease of use for different bulb sizes.
Easy Installation: Simplifies setup with quick, hassle-free application, saving time while delivering a clean, professional look.
Pre-Season Wholesale C9 Tuff Wedge Clip 800/Case
As Low As $0.16 per Clip
The Tuff Wedge Clip is the go-to choice for professional installers who need a fast and reliable way to secure C9 bulbs on holiday displays. Designed with convenience in mind, this versatile clip easily flexes over pre-installed bulbs, making it ideal for quick installations on socket wire lines. The Tuff Wedge Clip ensures a secure and polished look for your light displays, helping you create visually stunning installations with minimal effort.
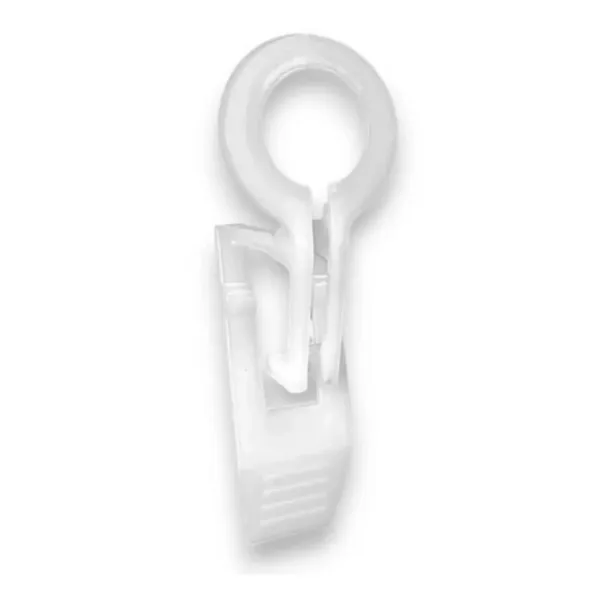
Colors Available:
White
Quantities Available:
800/case
Key Features:
Flexes Over Pre-Installed Bulbs: The Tuff Wedge Clip features a unique flexible design that allows it to snap directly over C9 bulbs already mounted on socket wire lines. This saves time and eliminates the need for removing or adjusting bulbs, making the installation process faster and more efficient.
Sturdy, Weather-Resistant Construction: Built from high-quality, UV-stabilized plastic, the Tuff Wedge Clip is engineered to resist harsh outdoor conditions, such as wind, rain, and snow. Its durable design prevents cracking and wear, ensuring long-lasting performance for both residential and commercial applications.
Ideal for Multiple Surfaces: Whether you’re working with shingles, gutters, or drip edges, the Tuff Wedge Clip provides a firm and secure grip on various surfaces, keeping lights in place without sagging or shifting.
Streamlined Installation: With the ability to clip directly over pre-installed bulbs, the Tuff Wedge Clip reduces installation time and simplifies the process, allowing for rapid and professional-looking displays that stand out during the holiday season.
Clean and Professional Finish: The Tuff Wedge Clip ensures that your C9 bulbs are perfectly aligned, giving your holiday light displays a clean, polished, and symmetrical appearance that will impress clients and onlookers alike.
Pre-Season Wholesale C9 Tuff Flex Clip 800/Case
As Low As $0.16 per Clip
The Tuff Flex Clip is the perfect solution for professional installers seeking a versatile and efficient way to secure C9 bulbs on their holiday displays. Specifically designed to work with pre-installed bulbs on socket wire lines, this innovative clip offers both convenience and flexibility, making installations smoother and faster. The Tuff Flex Clip provides a strong and secure hold while allowing for easy adjustments, ensuring that your lights remain perfectly aligned throughout the season.
Colors Available:
White
Quantities Available:
800/case
Key Features:
Flexes Over Pre-Installed Bulbs: The Tuff Flex Clip’s unique design allows it to clip directly over C9 bulbs already installed on socket wire lines. This feature makes it ideal for installers looking to streamline the installation process and reduce setup time without compromising quality.
Strong and Durable Construction: Made from high-quality, weather-resistant materials, the Tuff Flex Clip is built to withstand extreme outdoor conditions, including wind, rain, and snow, ensuring that your light displays stay securely in place all season long.
Secure and Professional Hold: The Tuff Flex Clip’s sturdy grip ensures that bulbs remain firmly attached, even on challenging surfaces like gutters, shingles, and drip edges. Its reliable hold prevents shifting or sagging, giving your holiday display a clean and professional appearance.
Ease of Use and Versatility: With the ability to clip over pre-installed bulbs, the Tuff Flex Clip offers unmatched convenience. Installers can quickly secure lights without removing or adjusting bulbs, making it an ideal choice for both residential and commercial installations.
Frequently Asked Questions
What surfaces are the clips compatible with?
Our clips are versatile and can be used on gutters, shingles, drip edges, and even flat surfaces when paired with parapet clips, making them suitable for various installations.
Are the clips durable for outdoor use?
Yes, all our clips are made from heavy-duty, weather-resistant plastic, ensuring they withstand harsh outdoor conditions like wind, rain, and snow.
What bulb types are the clips compatible with?
Most of our clips, including C9 Best Clips and Shingle Tab Clips, are compatible with both C7 and C9 bulbs, offering flexibility for different lighting setups.
How do Tuff Wedge and Tuff Flex Clips simplify installation?
These clips are designed to flex over pre-installed bulbs, allowing you to quickly and securely attach lights without removing or adjusting bulbs, saving time and effort.
What quantities and colors are the clips available in?
Our clips are available in quantities ranging from 500 to 2000 per case and come in colors like white, brown, and black, giving you options to suit your project needs.
Discover Expert Tips on Our Blog

Simplify Metal Cutting with DeWalt's 20V Max XR
Metal cutting is an essential skill in many DIY projects, especially when it involves precise installations like permanent Christmas lights. A common challenge for many is achieving clean, precise cuts without damaging the material or ending up with a jagged finish. The DeWalt cutter emerges as a practical solution, offering ease and precision. This blog explores how to effectively use the DeWalt cutter, ensuring your metal cuts are not just good, but exceptional.
Unboxing the DeWalt Cutter
Initial Impressions
Upon opening the DeWalt cutter's box, you're greeted with a robust tool that promises durability and precision. The package typically includes a variety of blades—each suited for different materials, but for our purposes, the metal blade is our focus. The heft and grip of the tool suggest it's built for heavy-duty tasks, yet it's designed ergonomically to prevent user fatigue during extended use.
Setting Up
Setting up the DeWalt cutter involves a straightforward process:
1. Blade Installation: Begin by removing the blade guard to access the blade slot. The metal blade included is specifically designed for slicing through metal with minimal burr and heat generation.
2. Securing the Blade: Utilize the provided tool to loosen the retaining bolt, insert the blade, ensuring it's seated properly, and then tighten the bolt. The cutter’s design features a reverse-thread system, which might feel counterintuitive (lefty tighty, righty loosey), but it ensures the blade remains secure under the tool’s high-torque operation.

Preparing for the First Cut
Safety First
Before making the first cut, it's crucial to don safety glasses and sturdy gloves. Metal cutting can produce sharp debris and sparks, which can be hazardous. The DeWalt cutter comes equipped with a blade guard and an emergency stop feature, enhancing safety during operation.
Making the Cut
Marking the metal accurately is key to a perfect cut. Use a permanent marker to draw your cut line clearly. Position the cutter so that the blade aligns with the mark. The tool’s guide light (if available) can help illuminate the line during the cut, ensuring precision.
Practical Cutting Tips
Techniques for Clean Cuts
- Maintain the Tool: Regular maintenance, such as cleaning the blade and lubricating the moving parts, can significantly extend the cutter's life and performance.
- Operate at the Right Speed: Adjust the cutter's speed based on the thickness and type of metal. Slower speeds are better for thicker, harder metals to prevent blade overheating and wear.
Advanced Cutting Techniques
- Angled Cuts: For angled cuts, adjust the blade guard to the desired angle. This feature is incredibly useful for creating joins or decorations in metalwork projects.
- Handling Complex Cuts: For intricate or complex cuts, make several shallow passes to gradually achieve the depth, rather than trying to cut through thick metal in one go.

Post-Cutting Cleanup and Maintenance
Cleaning and Storing the Cutter
After use, it’s important to clean the cutter thoroughly to remove any metal filings or debris. Storing the tool in a dry, clean environment will prevent rust and keep it ready for the next use.
Blade Maintenance
Regularly inspect the blade for signs of wear or damage. Replace the blade if it becomes dull or damaged to maintain cutting efficiency. Keeping a few spare blades on hand is recommended for seamless project continuation.
The DeWalt cutter is an indispensable tool for those requiring precise and clean cuts in metal. By following the above guidelines, users can maximize the tool’s capabilities and ensure their projects turn out both successful and safe.

1. What safety gear should I wear when using the DeWalt cutter?
Answer: Always wear safety glasses to protect your eyes from metal debris and sparks. Sturdy gloves are also recommended to safeguard your hands from sharp edges and heat. Additionally, if you are working in a noisy environment or the tool is particularly loud, consider using ear protection.
2. How do I install a blade on the DeWalt cutter?
Answer: To install a blade on the DeWalt cutter, first remove the blade guard to access the blade slot. Use the included tool to loosen the retaining bolt, insert the metal blade ensuring it's properly seated, and then retighten the bolt. Remember, the cutter uses a reverse-thread system, so you'll tighten to the left and loosen to the right.
3. What should I do if the cut isn't clean or precise?
Answer: Ensure the blade is sharp and properly installed. If issues persist, check that you’re using the correct blade type for the metal you are cutting. Additionally, adjust the speed settings according to the metal’s thickness and hardness. Multiple shallow passes may be necessary for thicker or harder metals.
4. How do I maintain the DeWalt cutter?
Answer: After each use, clean the cutter to remove any metal filings or debris. Regularly check and lubricate moving parts to keep them functioning smoothly. Store the cutter in a dry, clean environment to prevent rust and degradation. Blade maintenance is also crucial; inspect blades regularly for wear and replace them as needed.
5. Can the DeWalt cutter make angled cuts?
Answer: Yes, the DeWalt cutter can be adjusted to make angled cuts. Adjust the blade guard to your desired angle before cutting to achieve clean and precise angled cuts. This feature is useful for creating joins or customized shapes in your metalwork projects.

Copyright ©2026 All Right Reserved website designed by christmaslights.io
Terms of Service / Privacy Policy
Have questions or need assistance?
Contact us at (855)619-LITE