

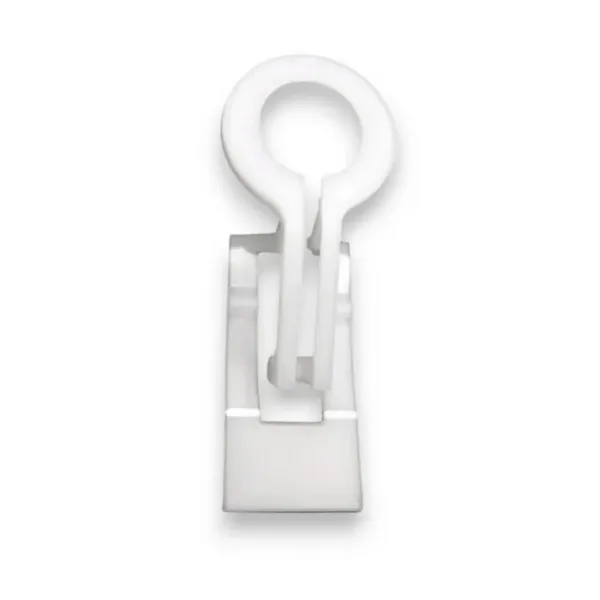
Wholesale Pricing Presale Christmas Lights Clips
Pre-Season Wholesale C9 Best Clips
As Low As $0.14 per Clip
Elevate your Christmas light installations with the C9 Best Clip, the industry’s top choice for professional holiday decorators. Designed by a professional installer specifically for other installers, this nearly unbreakable clip is crafted to withstand the rigors of outdoor use season after season. Whether you're working on gutters, drip edges, or even shingles, the C9 Best Clip is the versatile, durable solution that makes your job easier and keeps costs down over the years.
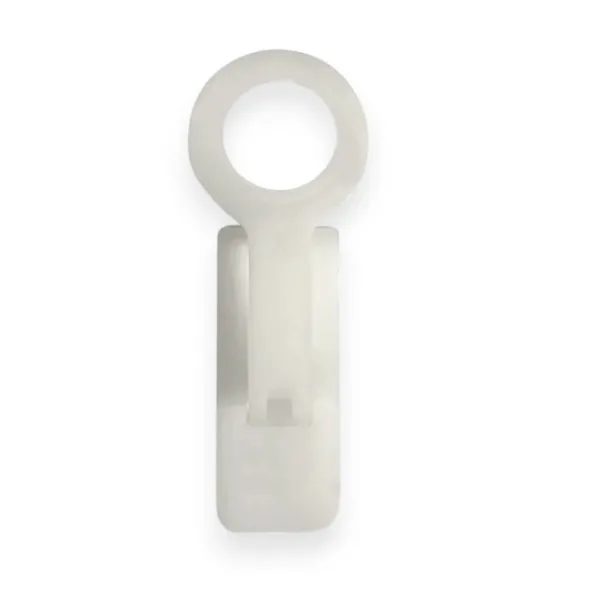
Colors Available:
White
Brown
Quantities Available:
1000/case
2000/case
Key Features:
Heavy-Duty Construction: Built from nearly unbreakable materials, the C9 Best Clip is designed to endure harsh weather conditions, ensuring reliable performance year after year.
Installer-Approved Design: Created by a professional Christmas light installer, this clip is engineered to meet the demands of the job, making installations faster and more efficient.
Versatile Use: The C9 Best Clip is perfect for securing lights along gutters, drip edges, and, in some cases, shingles, providing flexibility for a wide range of installation scenarios.
Cost-Effective: Reusable and durable, the C9 Best Clip is a cost-effective choice for professional installers, reducing the need for frequent replacements and lowering overall installation costs.
Recommended by Professionals: Trusted and recommended by expert Christmas light installers, the C9 Best Clip is the go-to solution for securing C9 bulbs and other holiday lighting elements.
Pre-Season Wholesale Best Shingle Tab Clips
As Low As $0.12 per Clip
Upgrade your Christmas light installations with the Durable Shingle Tab, designed to outlast and outperform standard shingle tabs. Made from highly durable plastic, this shingle tab provides a longer-lasting, more secure hold for both C7 and C9 sockets, ensuring your holiday lights stay perfectly in place. Whether you're installing lights on shingles, gutters, or decks, this versatile tab is the perfect Christmas light accessory.
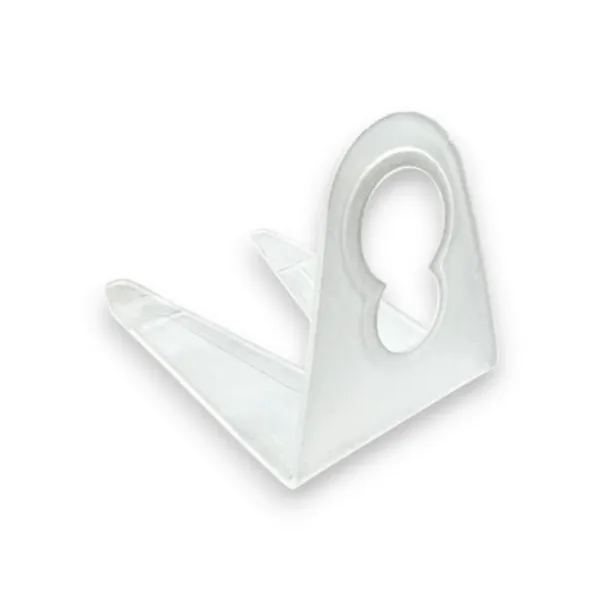
Colors Available:
White
Quantities Available:
1000/case
Key Features:
Very Durable Plastic: Constructed from premium, long-lasting plastic, this shingle tab is built to endure harsh weather conditions, providing years of reliable use—far exceeding the lifespan of standard shingle tabs.
Superior Socket Hold: Specifically designed to hold C7 and C9 sockets more securely than regular shingle tabs, ensuring your lights remain in place throughout the holiday season.
Easy Installation: The tab's design allows it to slide easily under shingles, making installation quicker and less frustrating than with other shingle tabs.
Versatile Use: Perfect for use on shingles, gutters, and decks. Simply wedge the legs within available spaces to secure the tab, or use it in conjunction with a parapet clip on flat surfaces for added stability.
Compatible with Parapet Clip: For flat surfaces, pair this shingle tab with a parapet clip to achieve a secure, professional-grade installation. It’s the perfect accessory for any Christmas light display.
Pre-Season Wholesale C9/C7 Best Enclosed Ridge Clips 500/Case
As Low As $0.40 per Clip
The Best Enclosed Ridge Clip is designed for professional holiday lighting installations, offering unbeatable security, durability, and versatility. Made from high-quality, durable plastic, this clip features an enclosed design that ensures it will never detach from the light strand, providing confidence that your lights will stay firmly in place. Its extended length accommodates any ridge shingle without causing damage, making it perfect for worry-free installations. Plus, it’s compatible with both C9 and C7 bulbs, adding even more flexibility to your setup.
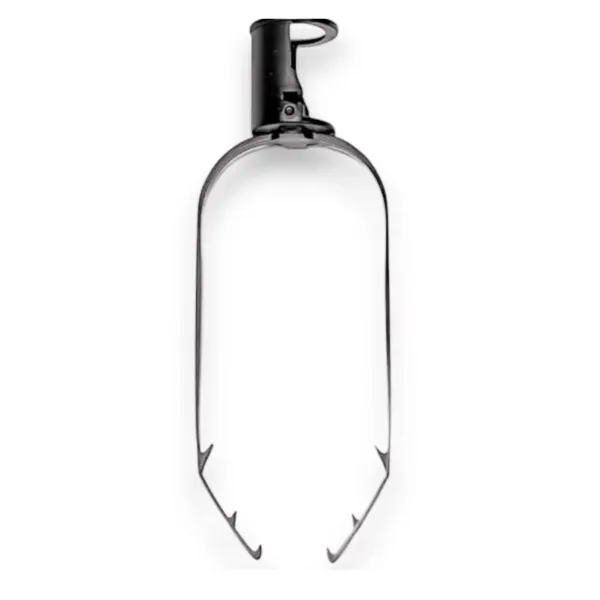
Colors Available:
Black
Quantities Available:
500/case
Key Features:
Durable Plastic Construction: Crafted from robust, high-grade plastic, these clips are built to endure tough weather conditions, ensuring long-lasting use season after season.
Enclosed Design: The unique enclosed structure securely locks onto the light strand, preventing the clip from slipping or detaching, even in windy or adverse weather.
Extended Length for Versatility: The longer design ensures a secure fit on any ridge shingle without causing damage, offering compatibility with various roof types.
Works with C9 and C7 Bulbs: Specifically designed to hold both C9 and C7 light strands, providing versatility and ease of use for different bulb sizes.
Easy Installation: Simplifies setup with quick, hassle-free application, saving time while delivering a clean, professional look.
Pre-Season Wholesale C9 Tuff Wedge Clip 800/Case
As Low As $0.16 per Clip
The Tuff Wedge Clip is the go-to choice for professional installers who need a fast and reliable way to secure C9 bulbs on holiday displays. Designed with convenience in mind, this versatile clip easily flexes over pre-installed bulbs, making it ideal for quick installations on socket wire lines. The Tuff Wedge Clip ensures a secure and polished look for your light displays, helping you create visually stunning installations with minimal effort.
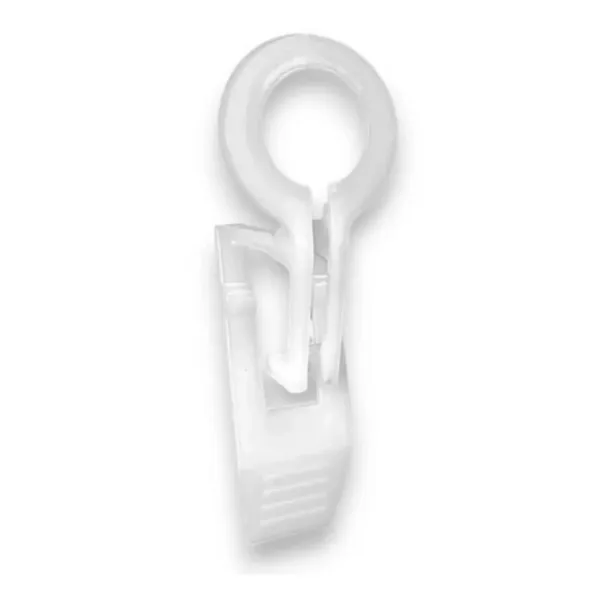
Colors Available:
White
Quantities Available:
800/case
Key Features:
Flexes Over Pre-Installed Bulbs: The Tuff Wedge Clip features a unique flexible design that allows it to snap directly over C9 bulbs already mounted on socket wire lines. This saves time and eliminates the need for removing or adjusting bulbs, making the installation process faster and more efficient.
Sturdy, Weather-Resistant Construction: Built from high-quality, UV-stabilized plastic, the Tuff Wedge Clip is engineered to resist harsh outdoor conditions, such as wind, rain, and snow. Its durable design prevents cracking and wear, ensuring long-lasting performance for both residential and commercial applications.
Ideal for Multiple Surfaces: Whether you’re working with shingles, gutters, or drip edges, the Tuff Wedge Clip provides a firm and secure grip on various surfaces, keeping lights in place without sagging or shifting.
Streamlined Installation: With the ability to clip directly over pre-installed bulbs, the Tuff Wedge Clip reduces installation time and simplifies the process, allowing for rapid and professional-looking displays that stand out during the holiday season.
Clean and Professional Finish: The Tuff Wedge Clip ensures that your C9 bulbs are perfectly aligned, giving your holiday light displays a clean, polished, and symmetrical appearance that will impress clients and onlookers alike.
Pre-Season Wholesale C9 Tuff Flex Clip 800/Case
As Low As $0.16 per Clip
The Tuff Flex Clip is the perfect solution for professional installers seeking a versatile and efficient way to secure C9 bulbs on their holiday displays. Specifically designed to work with pre-installed bulbs on socket wire lines, this innovative clip offers both convenience and flexibility, making installations smoother and faster. The Tuff Flex Clip provides a strong and secure hold while allowing for easy adjustments, ensuring that your lights remain perfectly aligned throughout the season.
Colors Available:
White
Quantities Available:
800/case
Key Features:
Flexes Over Pre-Installed Bulbs: The Tuff Flex Clip’s unique design allows it to clip directly over C9 bulbs already installed on socket wire lines. This feature makes it ideal for installers looking to streamline the installation process and reduce setup time without compromising quality.
Strong and Durable Construction: Made from high-quality, weather-resistant materials, the Tuff Flex Clip is built to withstand extreme outdoor conditions, including wind, rain, and snow, ensuring that your light displays stay securely in place all season long.
Secure and Professional Hold: The Tuff Flex Clip’s sturdy grip ensures that bulbs remain firmly attached, even on challenging surfaces like gutters, shingles, and drip edges. Its reliable hold prevents shifting or sagging, giving your holiday display a clean and professional appearance.
Ease of Use and Versatility: With the ability to clip over pre-installed bulbs, the Tuff Flex Clip offers unmatched convenience. Installers can quickly secure lights without removing or adjusting bulbs, making it an ideal choice for both residential and commercial installations.
Frequently Asked Questions
What surfaces are the clips compatible with?
Our clips are versatile and can be used on gutters, shingles, drip edges, and even flat surfaces when paired with parapet clips, making them suitable for various installations.
Are the clips durable for outdoor use?
Yes, all our clips are made from heavy-duty, weather-resistant plastic, ensuring they withstand harsh outdoor conditions like wind, rain, and snow.
What bulb types are the clips compatible with?
Most of our clips, including C9 Best Clips and Shingle Tab Clips, are compatible with both C7 and C9 bulbs, offering flexibility for different lighting setups.
How do Tuff Wedge and Tuff Flex Clips simplify installation?
These clips are designed to flex over pre-installed bulbs, allowing you to quickly and securely attach lights without removing or adjusting bulbs, saving time and effort.
What quantities and colors are the clips available in?
Our clips are available in quantities ranging from 500 to 2000 per case and come in colors like white, brown, and black, giving you options to suit your project needs.
Discover Expert Tips on Our Blog
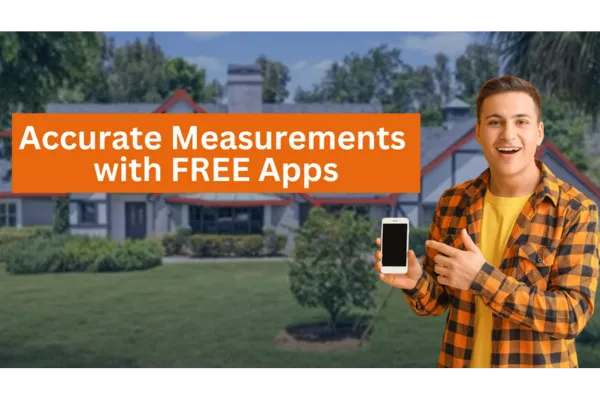
House Measurement Techniques for Accurate Bidding
When it comes to construction, renovation, or holiday decoration projects, accurate measurements are crucial. One wrong calculation can significantly impact your budget and timeline. Today, we'll explore three powerful free tools that help you measure buildings accurately from photos, ensuring your estimates are spot-on every time.
Why Accurate Measurements Matter
Consider this scenario: if you estimate a project at 140 feet when it's actually 200 feet, your cost calculations could be dramatically off. What started as $4 per foot might suddenly become $1 per foot, severely impacting your profit margins or project budget. This is why having reliable measuring techniques is essential for any contractor or DIY enthusiast.
Tool #1: ELEIF - The Professional's Choice
Measure in photo online ‐ eleif.net
ELEIF is a time-tested online measurement tool that offers precise calculations from photographs. Here's how to use it:
1. Upload your photo by dragging it into the interface
2. Set your reference measurement (typically a door width of 3 feet)
3. Use the measurement tool to mark key points along your structure
4. Record and add up all measurements
5. Add a 10% buffer for accuracy

Pro Tip: When measuring complex structures, always account for architectural features that might not be immediately visible in the photo, such as door overhangs or roof extensions.
Tool #2: Image Measurement
This user-friendly tool offers enhanced zoom capabilities for more precise measurements:
1. Import your photo
2. Use the zoom function to get a clearer view
3. Set your reference point (again, using a door or known object)
4. Take measurements by clicking points along the structure
5. Calculate total measurements
6. Compare results with other tools for accuracy

Tool #3: Canva - The Creative Solution
While primarily known for design work, Canva offers a surprisingly effective measurement solution:
1. Upload your photo to a YouTube thumbnail template
2. Use the ruler element tool
3. Set your reference measurement (3 feet for a standard door)
4. Duplicate and rotate the ruler to measure different sections
5. Track your measurements in increments (10 feet, 20 feet, etc.)

Best Practices for Digital Measuring
1. Use Known Reference Points
- Standard door width (3 feet)
- Garage doors (8 feet for single, 16 feet for double)
- Windows or other standard architectural features
2. Always Add a Buffer
- Include a 10% margin for error
- Account for hidden features not visible in photos
- Better to overestimate slightly than underestimate
3. Cross-Reference Your Results
- Use multiple tools to verify measurements
- Compare results between different methods
- Look for consistency in measurements
Common Pitfalls to Avoid
- Don't forget to account for:
- Door overhangs
- Architectural protrusions
- Roof extensions
- Corner details
- Changes in elevation
When to Use Which Tool
- ELEIF: Best for straight-line measurements and simple structures
- Image Measurement: Ideal for detailed work requiring zoom capability
- Canva: Perfect for quick estimates and visual reference points
Final Tips
1. Always verify your reference measurements
2. Take multiple measurements when possible
3. Document your process for consistency
4. Consider seasonal changes or structural variations
5. Keep records of your measurements for future reference
Remember, the goal isn't just to get a number – it's to get an accurate measurement that you can confidently use for project planning and execution. Whether you're a professional contractor or a DIY enthusiast, these tools can help you achieve precise measurements without stepping foot on the property.
Want to learn more about construction measurements and professional techniques? Visit ChristmasLights.io for additional resources and tips from industry experts.

Q: Why should I use multiple apps to measure the same building?
A: Using multiple measurement tools helps verify your calculations and ensures accuracy. Each tool has its own strengths - for example, Image Measurement offers better zoom capabilities, while Canva provides easy-to-duplicate measurement units. By cross-referencing results between different apps, you can catch potential errors and arrive at the most accurate measurement.
Q: What's the best reference point to use when measuring from a photo?
A: The most reliable reference points are standardized building features:
- A standard door (3 feet wide)
- A garage door (8 feet for single, 16 feet for double)
- Standard windows
Always try to use the garage door as your first choice since it provides a larger reference point, which can lead to more accurate measurements across the entire structure.
Q: Why should I add 10% to my measurements?
A: Adding 10% serves as a safety buffer for several reasons:
- Accounts for hidden architectural features not visible in photos
- Compensates for potential measurement errors
- Covers unexpected protrusions or overhangs
- Ensures you have enough materials for the project
It's better to slightly overestimate than to run short on materials or underquote a project.
Q: Can these tools replace physical measurements?
A: While these digital tools are extremely helpful for initial estimates and remote measurements, they work best as complementary tools to physical measurements. For final, detailed work, it's still recommended to take physical measurements when possible. However, these apps are excellent for:
- Initial project estimates
- Remote quotes
- Preliminary planning
- Situations where physical access isn't immediately possible
Q: What can cause inaccurate measurements when using these apps?
A: Several factors can affect measurement accuracy:
- Using an incorrect reference point size
- Not accounting for perspective in photos
- Overlooking architectural features like overhangs
- Poor photo quality or angle
- Not considering depth in protruding features
To minimize errors, always use clear photos taken straight-on, verify your reference measurements, and cross-check results between different tools.

Q: Are these tools really free to use?
A: Yes, all three tools mentioned (ELEIF, Image Measurement, and Canva) offer free versions that include their measurement capabilities. While Canva does have a premium version, the measurement features discussed are available in the free version.
Q: How do I handle complex architectural features like bay windows or irregular shapes?
A: For complex features:
1. Break down the measurement into smaller, manageable sections
2. Measure each section individually
3. Account for depth and protrusions
4. Add extra buffer for irregular shapes
5. Consider taking multiple photos from different angles to better understand the structure
Q: What's the best way to document measurements for future reference?
A: Best practices for measurement documentation include:
- Take screenshots your measurements in each app
- Create a spreadsheet with all measurements and calculations
- Note which reference points were used
- Record the date and conditions of measurement
- Save the original photos used for measuring
- Document any assumptions or special considerations made
Q: How accurate are these digital measuring tools?
A: When used correctly with proper reference points and clear photos, these tools can be accurate within 5-10% of physical measurements. However, accuracy depends on:
- Quality and angle of the reference photo
- Accuracy of the reference point measurement
- Complexity of the structure
- User expertise in using the tools
This is why using multiple tools and adding a 10% buffer is recommended for professional estimates.

Have more questions about digital measuring techniques? Visit ChristmasLights.io for additional resources and expert guidance.

Copyright ©2025 All Right Reserved website designed by christmaslights.io
Terms of Service / Privacy Policy
Have questions or need assistance?
Contact us at (855)619-LITE