

Blog
Our Top Blog Posts
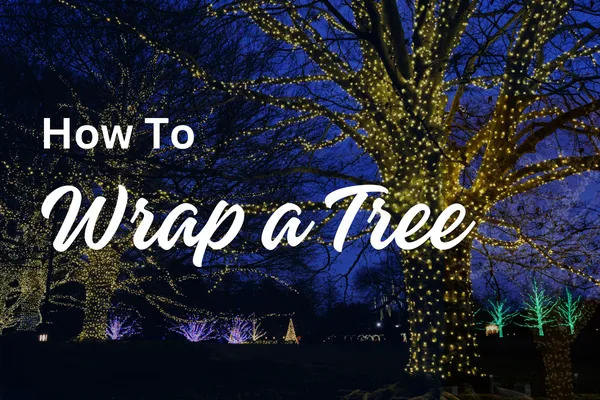
How to Wrap a Tree with Christmas Lights
Even if it seems daunting to take on the task of wrapping your trees with Christmas lights, don't let that deter you. This seemingly complex task is not as complicated as it may initially appear.
With a little bit of planning, the right equipment, and some simple techniques, you'll be able to transform your trees into a captivating display of lights in no time. We'll guide you through measuring your tree, selecting the right lights, and the step-by-step process of effectively wrapping your tree. For a simple, yet ingenious, DIY project that will enable you to hang Christmas lights on trees up to 25 feet tall, from the ground, see our blog post: The Ultimate Guide to Hanging Christmas Lights on Medium to Tall Trees from the Ground.
But first, let's address a crucial question: how do you determine the number of lights needed to wrap your tree? Stay tuned to find out.

Measuring Tree for Light Wrapping
Before you can begin wrapping your tree in twinkling lights, you'll first need to accurately measure its trunk and branches. This crucial first step will help you in choosing the right lights and efficiently creating a beautiful scene.
Start by measuring the circumference of the trunk at chest height. This gives you a good idea of the lights you'll need for the trunk.
Next, use a ladder to reach and measure the length of the branches you plan on wrapping. For branch selection, consider those that are sturdy enough to support the lights and can be reached safely using a ladder.
Remember, you're not just lighting a tree, you're creating a visual spectacle. Consider how the tree will look from different angles and distances.
When choosing the right lights, consider the size and color. Smaller LED lights work well for wrapping around branches, while larger bulbs can make a bold statement on the trunk. Consider a mix of both for a stunning effect.
Once you've got your measurements and lights, it's time to start wrapping. Begin at the base of the trunk, working your way up.
When it comes to wrapping higher branches, safety is paramount. Always use a steady ladder and if possible, have a helper to pass you the lights and ensure the ladder's stability.

Choosing the Right Light Spacing
Diving into the details, choosing the right light spacing is a crucial step in creating that magical tree light display you're aiming for. The Importance of this process can't be overstated - the right spacing can make the difference between a dazzling display and a dull dud.
Let's delve into the Techniques. Light spacing is generally measured in bulb to bulb distance. This can vary from 2 to 12 inches depending on the type of lights and your desired effect. Close spacing (2-3 inches) creates a vibrant, intense glow, ideal for a centerpiece tree. Wider spacing (6-12 inches) gives a more subtle illumination, perfect for large trees or background lighting.
Comparing the Pros and Cons of each, close spacing requires more lights and thus more power, but delivers a dramatic effect. Wider spacing is more economical and easier to install, but the effect is less intense.
Consider the benefits of each approach. Close spacing provides a stunning display that can be seen from a distance, making it a focal point of your decorations. Wider spacing, while subtler, allows the beauty of the tree itself to shine through, creating a more natural effect.
Ultimately, the choice of light spacing is down to your personal preference and the effect you're trying to achieve. Experiment with different spacings to see what works best for your tree. Remember, the goal is to enhance the natural beauty of the tree, not overwhelm it. So choose wisely and light up your Christmas with style!

Tips for Effective Light Wrapping
Now that you've got a handle on choosing the right light spacing, let's explore some effective tips for wrapping your tree with lights. To start, consider creative lighting techniques. Instead of simply wrapping the lights around the tree, try a zigzag pattern or intertwine multiple colors for a dazzling effect.
Next, think about your overall outdoor lighting design. Your tree shouldn't stand alone; instead, integrate it into the broader scene. If you have other trees in the backyard, wrap them too. Don't neglect smaller elements like bushes and railings – they can add depth and balance to your design.
You should also consider energy efficient lighting options. LED lights are a great choice as they consume less power and last longer than traditional bulbs. They're also safer, reducing the risk of fire hazards. Plus, they come in a variety of colors and styles, providing ample room for your DIY holiday decorations.
When it comes to lighting up your backyard, remember that less is often more. A few strategically placed lights can create a more dramatic and aesthetically pleasing effect than a yard full of glaring bulbs.

Step-by-Step Tree Wrapping Process
Let's jump right into the detailed process of wrapping your tree with Christmas lights, ensuring a dazzling display for the festive season. To start, you should measure the height and circumference of your tree. This will help you estimate how many strings of lights you'll need.
Now, let's discuss tree wrapping techniques. Begin at the base of the tree. Secure the end of the light string here, then start spiraling upward. Keep the spacing between each spiral consistent for an even glow. Don't be afraid to weave in and out of branches, creating creative light patterns for a twinkling effect.
Once you reach the top, you can either stop or reverse direction, spiraling back down to fill any gaps. Tree lighting design ideas can vary, so feel free to experiment. You can wrap just the trunk for a minimalist look or go all out and include the branches.
Looking for outdoor tree lighting inspiration? Consider using different colors or alternating white and colored lights for a unique look. You can also mix different sizes of lights to add depth to your display.
Finally, safety is paramount in all DIY tree lighting projects. Always use lights rated for outdoor use and avoid overloading your electrical circuits. Be careful on ladders and avoid working in adverse weather conditions.
Now that you know the basics of tree wrapping, you're ready to light up your yard this Christmas season. Happy decorating!
Popular LED Christmas Lights Choices
You have a myriad of options when it comes to choosing LED Christmas lights for your tree wrapping project. The LED light options offer energy efficient lighting, allowing you to display your festive holiday decorations without worrying about a sky-high electric bill. From cool whites to vibrant multicolors, there's a wide range of hues to choose from, each capable of creating a different ambience.
There are traditional, mini LED lights that are perfect for a classic, warm glow. If you're looking for something more dramatic, there are also larger, round bulbs that can create a bold and festive statement. For a winter wonderland feel, opt for the icicle-style lights that dangle from the branches. These creative lighting techniques can truly bring your tree to life.
Outdoor lighting ideas can be just as varied. Net lights are a great choice for an easy and even distribution of lights. They're especially handy if you're wrapping a large tree. For a more whimsical look, consider LED light options that flicker or change colors.
Trunk Wrap Vs. String Lights
When it comes to decorating your tree with lights, choosing between trunk wrap and string lights can significantly impact the aesthetics and installation process. Both have their unique benefits and drawbacks, so let's dive in to help you make an informed decision.
Trunk wrap lights, as the name suggests, are designed specifically for wrapping around the trunk of your tree. One of the key trunk wrap benefits is the ease of installation. They're typically designed to easily fit around the trunk, minimizing the time and effort you'd spend installing them. Another advantage is their cost-effectiveness. Trunk wrap lights often come in sets, making them a more affordable option if you have multiple trees to decorate.
However, if you're all about customization, string lights may be the way to go. Unlike trunk wrap lights, string lights offer complete customization in terms of light colors and spacing. You can wrap them not only around the trunk but also higher into the branches, creating a striking and unique visual impact.
Regardless of which lighting option you choose, don't forget the tree wrapping safety tips. Always ensure your lights are rated for outdoor use, keep electrical connections off the ground, and avoid overloading your electrical circuits.

Calculating Required Lights Quantity
Calculating the quantity of lights required for your tree involves some simple math and planning. First, measure your tree's height and the approximate width of its branches. A good rule of thumb is to use 100 lights for every foot and a half of tree, but this can vary depending on the density of the tree and how lit up you want it to be.
The benefits of LED lights can't be overstated when planning your tree lighting. LED lights are energy efficient lighting options, saving you money on your electricity bill. They also emit less heat, which reduces the risk of drying out your tree or creating a fire hazard.
Get creative with your light wrapping ideas. Instead of just wrapping the lights around the tree in a spiral, try zigzagging the lights, or wrapping individual branches for a unique look. LED lights are also available in a variety of colors and sizes, so you can customize your tree to your heart's content.
Of course, you may run into some common light wrapping problems. If your lights aren't working, first check to make sure they're plugged in and the outlet is working. If the lights still aren't illuminating, check for any blown bulbs or damaged wires. Most strings of lights have a spare fuse included, so if a whole section of lights is out, try replacing the fuse.
Safety Tips for Tree Light Wrapping
Ensuring safety while wrapping your tree with lights is paramount, so let's dive into some tips to keep you and your tree secure during this festive operation.
Firstly, ladder safety can't be stressed enough. Make sure you're using a sturdy, well-balanced ladder that's appropriate for your tree's height. Never overreach or stand on the top rungs and always have someone around to hold the ladder steady.
Next, consider electrical safety. Always check your light strands for any signs of damage before you start wrapping your tree. Damaged wires can be a fire hazard, so it's essential to use only lights in good condition. When using extension cords, make sure they're rated for outdoor use and keep connections off the ground to prevent water damage.
Pay attention to weather conditions as well. It's best to avoid wrapping your tree in wet or windy conditions. Not only can these conditions be hazardous, but they can also damage your lights or cause them to be less secure.
Securing lights is another vital step. Use light clips or ties to secure your lights to the tree, ensuring they won't come loose in windy conditions. Avoid using nails or staples as they can damage your tree and potentially the light cords.
And there you have it! With just a few steps, you've transformed your trees into twinkling masterpieces. Remember, it's all about choosing the right lights, measuring accurately, and wrapping carefully. Safety should always be your priority. So, get out there, let your creativity shine, and make your yard the envy of the neighborhood. This festive season, your trees won't just be part of the landscape, they'll be the star of the show!

How do I calculate the number of Christmas lights needed to wrap my tree?
Calculating the necessary quantity of lights involves measuring your tree's height and the circumference of its trunk and branches you plan to decorate. A general guideline is to use approximately 100 lights for every 1.5 feet of tree height. However, this can vary based on your desired brightness and the density of the tree's foliage. Measure the tree accurately and consider the spacing between lights to ensure a vibrant display.
What type of lights should I use for wrapping trees?
LED lights are highly recommended for tree wrapping due to their energy efficiency, longevity, and low heat emission. They come in various sizes and colors, allowing for customization according to your decorative vision. Smaller LED lights are ideal for wrapping around branches, while larger bulbs can create a bold statement on the trunk. Consider a mix of both for a dynamic effect.
Can I wrap trees with lights myself, or should I hire a professional?
While DIY tree wrapping is achievable with the right preparation and safety measures, hiring a professional can offer added benefits such as expertise in lighting design, high-quality equipment, and efficiency. If you're comfortable using ladders and handling electrical equipment, a DIY approach can be a fulfilling project. However, for intricate designs or tall trees, professional services might be safer and more effective.
How do I ensure safety when wrapping my tree with lights?
Safety should always be your top priority. Use a sturdy ladder for reaching higher branches and ensure it is securely placed on stable ground. Opt for outdoor-rated lights and extension cords to prevent electrical hazards. Check all light strands for damage before use and avoid overloading electrical outlets. If possible, have a helper to steady the ladder and assist with handing you the lights.
How do I start wrapping my tree with lights?
Begin at the base of the trunk, securing the end of your light strand. Wrap the lights around the trunk, moving upward in a spiral pattern. Maintain consistent spacing between wraps for an even look. For branch wrapping, select sturdy branches and wrap the lights, moving outwards from the trunk. Consider the tree's overall appearance from various angles to ensure a balanced and aesthetically pleasing display.
What creative lighting techniques can I use to enhance my tree wrapping?
Experiment with different patterns and colors for a unique display. Zigzagging the lights or using a combination of white and colored lights can add depth and interest. Intertwining multiple colors or incorporating flashing lights can create a dynamic visual effect. Consider the overall theme of your holiday decorations and choose techniques that complement your design.
How do I handle higher branches safely?
When wrapping higher branches, always prioritize safety. Use a ladder that reaches comfortably to the desired height, and never overextend yourself. It's advisable to have someone with you to stabilize the ladder and assist with the lights. If branches are too high or difficult to reach safely, consider focusing on the lower and more accessible parts of the tree.
What are the benefits of using solar-powered lights for tree wrapping?
Solar-powered lights offer the advantage of being environmentally friendly and cost-effective, as they do not consume electricity from your home. They are equipped with sensors that automatically turn the lights on at dusk, providing convenience and ensuring your display is lit without manual intervention. Solar lights are particularly suitable for areas with ample sunlight exposure during the day.
How do I choose the right light spacing for my tree?
Light spacing can significantly affect the visual impact of your display. Close spacing (2-3 inches) creates a more intense and vibrant glow, ideal for highlighting focal points. Wider spacing (6-12 inches) offers a subtler illumination, suitable for larger trees or creating a gentle background effect. Consider the tree's size, shape, and your desired outcome when choosing light spacing.
How do I integrate my wrapped tree into the overall outdoor lighting design?
View your tree as a component of your larger holiday lighting scheme. Coordinate the colors and styles of your tree lights with other outdoor decorations for a cohesive look. Consider wrapping additional trees, bushes, or architectural features to unify the scene. Incorporate timers or smart lighting controls to synchronize your display, creating an immersive and harmonious holiday atmosphere.

How to Wrap a Tree with Christmas Lights
Even if it seems daunting to take on the task of wrapping your trees with Christmas lights, don't let that deter you. This seemingly complex task is not as complicated as it may initially appear.
With a little bit of planning, the right equipment, and some simple techniques, you'll be able to transform your trees into a captivating display of lights in no time. We'll guide you through measuring your tree, selecting the right lights, and the step-by-step process of effectively wrapping your tree. For a simple, yet ingenious, DIY project that will enable you to hang Christmas lights on trees up to 25 feet tall, from the ground, see our blog post: The Ultimate Guide to Hanging Christmas Lights on Medium to Tall Trees from the Ground.
But first, let's address a crucial question: how do you determine the number of lights needed to wrap your tree? Stay tuned to find out.
Measuring Tree for Light Wrapping
Before you can begin wrapping your tree in twinkling lights, you'll first need to accurately measure its trunk and branches. This crucial first step will help you in choosing the right lights and efficiently creating a beautiful scene.
Start by measuring the circumference of the trunk at chest height. This gives you a good idea of the lights you'll need for the trunk.
Next, use a ladder to reach and measure the length of the branches you plan on wrapping. For branch selection, consider those that are sturdy enough to support the lights and can be reached safely using a ladder.
Remember, you're not just lighting a tree, you're creating a visual spectacle. Consider how the tree will look from different angles and distances.
When choosing the right lights, consider the size and color. Smaller LED lights work well for wrapping around branches, while larger bulbs can make a bold statement on the trunk. Consider a mix of both for a stunning effect.
Once you've got your measurements and lights, it's time to start wrapping. Begin at the base of the trunk, working your way up.
When it comes to wrapping higher branches, safety is paramount. Always use a steady ladder and if possible, have a helper to pass you the lights and ensure the ladder's stability.
Choosing the Right Light Spacing
Diving into the details, choosing the right light spacing is a crucial step in creating that magical tree light display you're aiming for. The Importance of this process can't be overstated - the right spacing can make the difference between a dazzling display and a dull dud.
Let's delve into the Techniques. Light spacing is generally measured in bulb to bulb distance. This can vary from 2 to 12 inches depending on the type of lights and your desired effect. Close spacing (2-3 inches) creates a vibrant, intense glow, ideal for a centerpiece tree. Wider spacing (6-12 inches) gives a more subtle illumination, perfect for large trees or background lighting.
Comparing the Pros and Cons of each, close spacing requires more lights and thus more power, but delivers a dramatic effect. Wider spacing is more economical and easier to install, but the effect is less intense.
Consider the benefits of each approach. Close spacing provides a stunning display that can be seen from a distance, making it a focal point of your decorations. Wider spacing, while subtler, allows the beauty of the tree itself to shine through, creating a more natural effect.
Ultimately, the choice of light spacing is down to your personal preference and the effect you're trying to achieve. Experiment with different spacings to see what works best for your tree. Remember, the goal is to enhance the natural beauty of the tree, not overwhelm it. So choose wisely and light up your Christmas with style!
Tips for Effective Light Wrapping
Now that you've got a handle on choosing the right light spacing, let's explore some effective tips for wrapping your tree with lights. To start, consider creative lighting techniques. Instead of simply wrapping the lights around the tree, try a zigzag pattern or intertwine multiple colors for a dazzling effect.
Next, think about your overall outdoor lighting design. Your tree shouldn't stand alone; instead, integrate it into the broader scene. If you have other trees in the backyard, wrap them too. Don't neglect smaller elements like bushes and railings – they can add depth and balance to your design.
You should also consider energy efficient lighting options. LED lights are a great choice as they consume less power and last longer than traditional bulbs. They're also safer, reducing the risk of fire hazards. Plus, they come in a variety of colors and styles, providing ample room for your DIY holiday decorations.
When it comes to lighting up your backyard, remember that less is often more. A few strategically placed lights can create a more dramatic and aesthetically pleasing effect than a yard full of glaring bulbs.
Step-by-Step Tree Wrapping Process
Let's jump right into the detailed process of wrapping your tree with Christmas lights, ensuring a dazzling display for the festive season. To start, you should measure the height and circumference of your tree. This will help you estimate how many strings of lights you'll need.
Now, let's discuss tree wrapping techniques. Begin at the base of the tree. Secure the end of the light string here, then start spiraling upward. Keep the spacing between each spiral consistent for an even glow. Don't be afraid to weave in and out of branches, creating creative light patterns for a twinkling effect.
Once you reach the top, you can either stop or reverse direction, spiraling back down to fill any gaps. Tree lighting design ideas can vary, so feel free to experiment. You can wrap just the trunk for a minimalist look or go all out and include the branches.
Looking for outdoor tree lighting inspiration? Consider using different colors or alternating white and colored lights for a unique look. You can also mix different sizes of lights to add depth to your display.
Finally, safety is paramount in all DIY tree lighting projects. Always use lights rated for outdoor use and avoid overloading your electrical circuits. Be careful on ladders and avoid working in adverse weather conditions.
Now that you know the basics of tree wrapping, you're ready to light up your yard this Christmas season. Happy decorating!
Popular LED Christmas Lights Choices
You have a myriad of options when it comes to choosing LED Christmas lights for your tree wrapping project. The LED light options offer energy efficient lighting, allowing you to display your festive holiday decorations without worrying about a sky-high electric bill. From cool whites to vibrant multicolors, there's a wide range of hues to choose from, each capable of creating a different ambience.
There are traditional, mini LED lights that are perfect for a classic, warm glow. If you're looking for something more dramatic, there are also larger, round bulbs that can create a bold and festive statement. For a winter wonderland feel, opt for the icicle-style lights that dangle from the branches. These creative lighting techniques can truly bring your tree to life.
Outdoor lighting ideas can be just as varied. Net lights are a great choice for an easy and even distribution of lights. They're especially handy if you're wrapping a large tree. For a more whimsical look, consider LED light options that flicker or change colors.
Trunk Wrap Vs. String Lights
When it comes to decorating your tree with lights, choosing between trunk wrap and string lights can significantly impact the aesthetics and installation process. Both have their unique benefits and drawbacks, so let's dive in to help you make an informed decision.
Trunk wrap lights, as the name suggests, are designed specifically for wrapping around the trunk of your tree. One of the key trunk wrap benefits is the ease of installation. They're typically designed to easily fit around the trunk, minimizing the time and effort you'd spend installing them. Another advantage is their cost-effectiveness. Trunk wrap lights often come in sets, making them a more affordable option if you have multiple trees to decorate.
However, if you're all about customization, string lights may be the way to go. Unlike trunk wrap lights, string lights offer complete customization in terms of light colors and spacing. You can wrap them not only around the trunk but also higher into the branches, creating a striking and unique visual impact.
Regardless of which lighting option you choose, don't forget the tree wrapping safety tips. Always ensure your lights are rated for outdoor use, keep electrical connections off the ground, and avoid overloading your electrical circuits.
Calculating Required Lights Quantity
Calculating the quantity of lights required for your tree involves some simple math and planning. First, measure your tree's height and the approximate width of its branches. A good rule of thumb is to use 100 lights for every foot and a half of tree, but this can vary depending on the density of the tree and how lit up you want it to be.
The benefits of LED lights can't be overstated when planning your tree lighting. LED lights are energy efficient lighting options, saving you money on your electricity bill. They also emit less heat, which reduces the risk of drying out your tree or creating a fire hazard.
Get creative with your light wrapping ideas. Instead of just wrapping the lights around the tree in a spiral, try zigzagging the lights, or wrapping individual branches for a unique look. LED lights are also available in a variety of colors and sizes, so you can customize your tree to your heart's content.
Of course, you may run into some common light wrapping problems. If your lights aren't working, first check to make sure they're plugged in and the outlet is working. If the lights still aren't illuminating, check for any blown bulbs or damaged wires. Most strings of lights have a spare fuse included, so if a whole section of lights is out, try replacing the fuse.
Safety Tips for Tree Light Wrapping
Ensuring safety while wrapping your tree with lights is paramount, so let's dive into some tips to keep you and your tree secure during this festive operation.
Firstly, ladder safety can't be stressed enough. Make sure you're using a sturdy, well-balanced ladder that's appropriate for your tree's height. Never overreach or stand on the top rungs and always have someone around to hold the ladder steady.
Next, consider electrical safety. Always check your light strands for any signs of damage before you start wrapping your tree. Damaged wires can be a fire hazard, so it's essential to use only lights in good condition. When using extension cords, make sure they're rated for outdoor use and keep connections off the ground to prevent water damage.
Pay attention to weather conditions as well. It's best to avoid wrapping your tree in wet or windy conditions. Not only can these conditions be hazardous, but they can also damage your lights or cause them to be less secure.
Securing lights is another vital step. Use light clips or ties to secure your lights to the tree, ensuring they won't come loose in windy conditions. Avoid using nails or staples as they can damage your tree and potentially the light cords.
And there you have it! With just a few steps, you've transformed your trees into twinkling masterpieces. Remember, it's all about choosing the right lights, measuring accurately, and wrapping carefully. Safety should always be your priority. So, get out there, let your creativity shine, and make your yard the envy of the neighborhood. This festive season, your trees won't just be part of the landscape, they'll be the star of the show!
How do I calculate the number of Christmas lights needed to wrap my tree?
Calculating the necessary quantity of lights involves measuring your tree's height and the circumference of its trunk and branches you plan to decorate. A general guideline is to use approximately 100 lights for every 1.5 feet of tree height. However, this can vary based on your desired brightness and the density of the tree's foliage. Measure the tree accurately and consider the spacing between lights to ensure a vibrant display.
What type of lights should I use for wrapping trees?
LED lights are highly recommended for tree wrapping due to their energy efficiency, longevity, and low heat emission. They come in various sizes and colors, allowing for customization according to your decorative vision. Smaller LED lights are ideal for wrapping around branches, while larger bulbs can create a bold statement on the trunk. Consider a mix of both for a dynamic effect.
Can I wrap trees with lights myself, or should I hire a professional?
While DIY tree wrapping is achievable with the right preparation and safety measures, hiring a professional can offer added benefits such as expertise in lighting design, high-quality equipment, and efficiency. If you're comfortable using ladders and handling electrical equipment, a DIY approach can be a fulfilling project. However, for intricate designs or tall trees, professional services might be safer and more effective.
How do I ensure safety when wrapping my tree with lights?
Safety should always be your top priority. Use a sturdy ladder for reaching higher branches and ensure it is securely placed on stable ground. Opt for outdoor-rated lights and extension cords to prevent electrical hazards. Check all light strands for damage before use and avoid overloading electrical outlets. If possible, have a helper to steady the ladder and assist with handing you the lights.
How do I start wrapping my tree with lights?
Begin at the base of the trunk, securing the end of your light strand. Wrap the lights around the trunk, moving upward in a spiral pattern. Maintain consistent spacing between wraps for an even look. For branch wrapping, select sturdy branches and wrap the lights, moving outwards from the trunk. Consider the tree's overall appearance from various angles to ensure a balanced and aesthetically pleasing display.
What creative lighting techniques can I use to enhance my tree wrapping?
Experiment with different patterns and colors for a unique display. Zigzagging the lights or using a combination of white and colored lights can add depth and interest. Intertwining multiple colors or incorporating flashing lights can create a dynamic visual effect. Consider the overall theme of your holiday decorations and choose techniques that complement your design.
How do I handle higher branches safely?
When wrapping higher branches, always prioritize safety. Use a ladder that reaches comfortably to the desired height, and never overextend yourself. It's advisable to have someone with you to stabilize the ladder and assist with the lights. If branches are too high or difficult to reach safely, consider focusing on the lower and more accessible parts of the tree.
What are the benefits of using solar-powered lights for tree wrapping?
Solar-powered lights offer the advantage of being environmentally friendly and cost-effective, as they do not consume electricity from your home. They are equipped with sensors that automatically turn the lights on at dusk, providing convenience and ensuring your display is lit without manual intervention. Solar lights are particularly suitable for areas with ample sunlight exposure during the day.
How do I choose the right light spacing for my tree?
Light spacing can significantly affect the visual impact of your display. Close spacing (2-3 inches) creates a more intense and vibrant glow, ideal for highlighting focal points. Wider spacing (6-12 inches) offers a subtler illumination, suitable for larger trees or creating a gentle background effect. Consider the tree's size, shape, and your desired outcome when choosing light spacing.
How do I integrate my wrapped tree into the overall outdoor lighting design?
View your tree as a component of your larger holiday lighting scheme. Coordinate the colors and styles of your tree lights with other outdoor decorations for a cohesive look. Consider wrapping additional trees, bushes, or architectural features to unify the scene. Incorporate timers or smart lighting controls to synchronize your display, creating an immersive and harmonious holiday atmosphere.
Copyright ©2026 All Right Reserved website designed by christmaslights.io
Terms of Service / Privacy Policy
Have questions or need assistance?
Contact us at (855)619-LITE